This guide describes how to connect two remote Macs via OpenVPN using a static key configuration.
Standard disclaimer applies, as always: You are 100% responsible for your own actions. Using this guide, visiting a link, downloading a program, in short, living, is done entirely at your own risk (and joy).
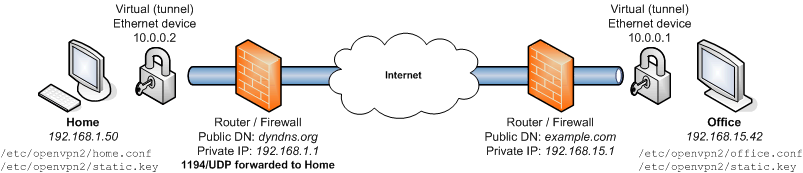
IP addresses and domains appearing in italics will likely differ on your networks. The only two addresses you need to know are Home's (for setting up port forwarding) and the public address for Home's router (which you will specify in office.conf).
sudo port -d selfupdatesudo /opt/local/bin/port)sudo port install openvpn2Now we'll make a quick, unencrypted connection to test our setup:
Office$sudo openvpn2 --remote dyndns.org --dev tun0 --ifconfig 10.0.0.1 10.0.0.2Home$sudo openvpn2 --dev tun0 --ifconfig 10.0.0.2 10.0.0.1
Replace dyndns.org with Home's public hostname or IP address. Also, if you receive a "command not found" error, use the complete path to openvpn2 instead: sudo /opt/local/sbin/openvpn2 .
Try pinging Office from Home and vice versa:
Home$ping 10.0.0.1Office$ping 10.0.0.2
When finished testing, CTRL C to stop the tunnel.
From either computer, generate a static key:
$openvpn2 --genkey --secret static.key$sudo mkdir /etc/openvpn2$sudo mv static.key /etc/openvpn2/
Copy /etc/openvpn2/static.key to the other computer via a secure channel (as anyone with this file can access your VPN) and put it in the same directory, i.e., /etc/openvpn2 .
Office$sudo openvpn2 --remote dyndns.org --dev tun0 --ifconfig 10.0.0.1 10.0.0.2 --secret /etc/openvpn2/static.key --comp-lzo --keepalive 10 60 --floatHome$sudo openvpn2 --dev tun0 --ifconfig 10.0.0.2 10.0.0.1 --secret /etc/openvpn2/static.key --comp-lzo --keepalive 10 60 --float
As before, replace dyndns.org with Home's public address. The tunnel should be up and running. You can test with ping again, or connect to services (like File Sharing) on the remote Mac.
If you only need the occasional tunnel, feel free to stop here - just leave the Terminal windows open and the tunnel will persist until it is terminated (by rebooting, quitting Terminal, etc). If you'd like to create config files and/or make your tunnel survive rebooting, read on.
On Office, save the following as /etc/openvpn2/office.conf:
   dev tun
   remote dyndns.org
   ifconfig 10.0.0.1 10.0.0.2
   secret /etc/openvpn2/static.key
   comp-lzo
   keepalive 10 60
   float
Replace dyndns.org with the public hostname or IP address of Home.
On Home, create /etc/openvpn2/home.conf as follows:
   dev tun
   ifconfig 10.0.0.2 10.0.0.1
   secret /etc/openvpn2/static.key
   comp-lzo
   keepalive 10 60
floatOffice$sudo openvpn2 /etc/openvpn2/office.confHome$sudo openvpn2 /etc/openvpn2/home.conf
Your tunnel should now be connected. Try pinging, connecting to services, etc to verify. As before, the tunnel will persist until it is quit, Terminal is terminated, etc. The next section deals with having OpenVPN automatically launch on system startup.
<?xml version="1.0" encoding="UTF-8"?>
<!DOCTYPE plist PUBLIC "-//Apple Computer//DTD PLIST 1.0//EN"
"http://www.apple.com/DTDs/PropertyList-1.0.dtd";>
<plist version="1.0">

<dict>
        <key>Label</key>
        <string>org.openvpn2</string>
        <key>OnDemand</key>
        <false/>
        <key>Program</key>
        <string>/opt/local/sbin/openvpn2</string>

        <key>ProgramArguments</key>
        <array>
                <string>openvpn2</string>
                <string>--config</string>
                <string>home.conf</string>
        </array>
        <key>RunAtLoad</key>

<true/>
        <key>TimeOut</key>
        <integer>90</integer>
        <key>WorkingDirectory</key>
        <string>/etc/openvpn2</string>
</dict>
</plist>$sudo chown root /Library/LaunchDaemons/openvpn2.plist$sudo chgrp wheel /Library/LaunchDaemons/openvpn2.plist
$ sudo launchctl load -w /Library/LaunchDaemons/openvpn2.plist--port number, or in your config file with port number.created: 2008.03.02